Wrightwood has over forty original, wood, double-hung windows and over twenty doors. Preserving the original millwork and trim work in the house has been a priority from the very beginning of this project. With the guest room we got to test out all the little tricks we've learned along the way to revive the original paint-caked, but totally beautiful and just waiting to be revived. Through a little trial and error (and grilling craftsmen for their tips) I've compiled what we've learned if you decide to take on a similar task in your home! Public Service Announcement: Safety first y'all. Make sure to test for lead paint, take safety measures if it's found, and use proper eye and respiratory protection.
TOOLS + MATERIALS
- Plastic Dropcloths
- Belt Sander
- Mouse Sander
- Sand Paper (ranging in grit from 50-120)
- Wood Filler
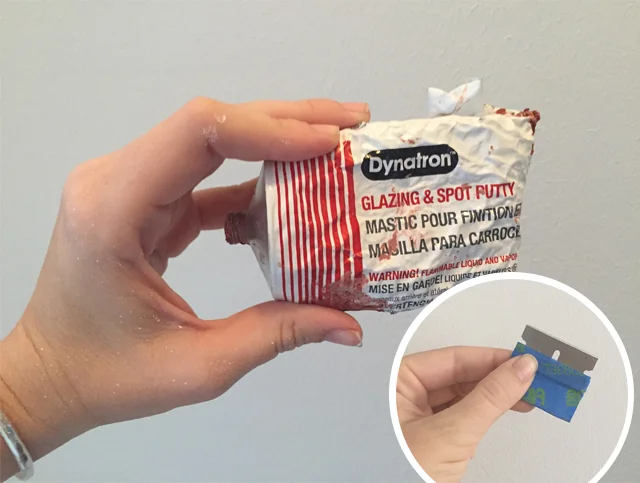
- Pre-mixed Bondo (make sure it is made for use on wood)
- Razor Blade
- Painter's Tape
- Tack Cloths
- Spray Primer
- Trim Paint
- Paint Brush
1. Prep Your Space
In a perfect, well planned, world you would remove the trim so you could take it outside for the majority of these steps. We unfortunately are unable to without damaging the drywall and so we've been doing all of these messy steps inside. If you're faced with a similar situation, properly prepping your space will save you 1000 headaches down the road. Clean up will be easier, sanding dust with be contained, and your floors will be spared from overspray and paint drips. We have wood floors, I think wall to wall carpet would be a whole different (nightmarish) story, so we started by placing painters tape directly on the floor anywhere any of the trim work meets the floor (this will keep the overspray from the primer from sneaking under the edges of your drop cloth - even when you tape that down too). Then carefully cover the entire floor with plastic drop cloths and tape them to each other and around the edges of the room. Trust me, sawdust will get everywhere. Stuff a towel under the door to keep it from dusting up your hallway or other rooms too.
2. Removing Old Paint + Fill Major Blemishes
A belt sander is your best bet. Someone in our house got a little overenthusiastic with a disc sander and gouged all these round little cuts into the trim. Carefully run the belt sander along the trim with the grain so you don't have to correct it later. Get as much of the paint off as you can with a rougher grit sandpaper (40-50 grit should do). Pro Tip: The lower the number on the sandpaper the rougher the texture, big numbers like 120-220 are super fine and great for finish sanding. If there are any bigger holes or gouges carefully fill them with wood filler, let it dry and hand sand down any roughness.
3. Clean Up and Spray Prime Round One
Before you paint, always and forever, wipe down your surface. You can use a clean rag, but a tack cloth makes things easier and their slight stickiness makes sure you get every last bit of dust. I say spray prime round one because we found that once you get a layer of primer on there you can see any last spots you need to even out to get a super smooth surface.

From the Left: Trimwork after the first major sand and filling with wood filler, Post-first spray prime and evening out with bondo, post-second sand and second prime - all ready for paint!
4. The Awesomeness of Bondo
So this is a trick we learned from the man who painted our kitchen cabinets. Typically bondo is used on cars and is something you need to mix and then use up quickly. But then our cabinet painter showed us this. It's premixed and you can purchase it at Autozone or O'Reillys. Make sure the kind you get has wood listed as one of the surfaces you can use it on. Using a razor blade you can carefully skim it over rough patches to even out the wood and get a super smooth finish. Make sure you have adequate ventilation bc this stuff doesn't smell great, AND you'll need to let it dry for a bit. Pro Tip: Take a piece of painters tape and fold it around the end of the razor blade to give you a little more surface to hold onto.
5. Sand...Prime...Sand Again!
Take your mouse sander (or a square of sandpaper and your hand) and go over everything one last time. Use a 120 or 220 grit sandpaper for a really fine sand. Pro Tip: As you finish an area, close your eyes and run your hand over it to feel for roughness. Best way to feel if you missed a spot! Once you're happy with the level of smoothness (and trust me, it doesn't have to be perfect, if you've got old, original trim to work with it's probably an older home and character is something to embrace. That and you'll drive yourself crazy trying to get it perfectly smooth!), take your tack cloth and wipe any dust off of everything before your second round of priming. Make sure you cover all the red from the bondo; again, it doesn't have to her perfect, but at least a enough that the red won't show through when you paint!
6. The Final Paint
For Wrightwood I used the Benjamin Moore paint pictured above in Super White. It's a great "in between" of an acrylic and an oil based enamel. It cleans up with water (though the can does suggest once your paintbrush is all rinsed you do a final rinse with mineral spirits) but it's thick and self levels really beautifully - meaning that as you paint it on you may see a LOT of brushstrokes but as it sits the strokes seem to fade away like magic! That said though make sure you paint quickly because it does dry fast and if you find you missed a spot it's best to let it dry entirely before painting over it instead of risking it getting a little gummed up. Honestly ladies, it's a lot like nail polish. Have you ever tried to put on a second coat but then it's not quite dry and not wet enough and you end up with this weird gunked up gummy spot? It's kind of like that. Pro Tip: Start from the top. So on a door frame that means paint the top horizontal piece, then the two vertical sides. On a window do the same: Top horizontal, then vertical mullions, then horizontal sill - always painting in the direction of the wood - horizontal strokes on horizontal boards, vertical strokes on vertical boards.

Ta-da! All Done!
This is a couple-days-long project factoring in drying time for the wood filler, bondo, and primer, but I hope this tutorial gives you a comfort level with the process and that you'll feel confident enough to give this a shot! If you have any questions, I'd love to answer them in the comment section! Best of luck!